
Note: This is the Chinese guide for the Typace theme, written according to the latest version of Typace (excluding beta versions). For the English version, please see the GitHub repository.
P0 Project Framework Structure
pages/: Contains the main pages of the websiteabout.js: Retrieves and displays the about page content fromabout.mdindex.js: Blog homepage, contains basic blog informationposts/: Stores individual article pagesarchives.js: Archives articles in chronological ordertags.js: Categorizes articles by MD frontmatter tags_document.js: Webpage tab bar informationapi/: Stores API filessitemap.js: Sitemap
source/: Article storage directorylib/posts.js: Contains functions to retrieve and sort blog post data from thesource/directorystyles/globals.css: Global CSS configurationtailwind.config.js: Tailwind CSS style references
P1 Basic Project Configuration and Deployment
This blog supports online editing and development on GitHub. It is recommended to deploy directly using Vercel online installation; local installation is also possible.
Current project version: v2.0.1
1.1 Online Installation
- This project is hosted on GitHub and deployed using Vercel. Simply click the button below to automatically clone the repository and deploy it on Vercel.
[Note] If you do not have a Vercel account, please use GitHub to log in/register for quick login, so that GitHub can automatically pull this repository to your account.
-
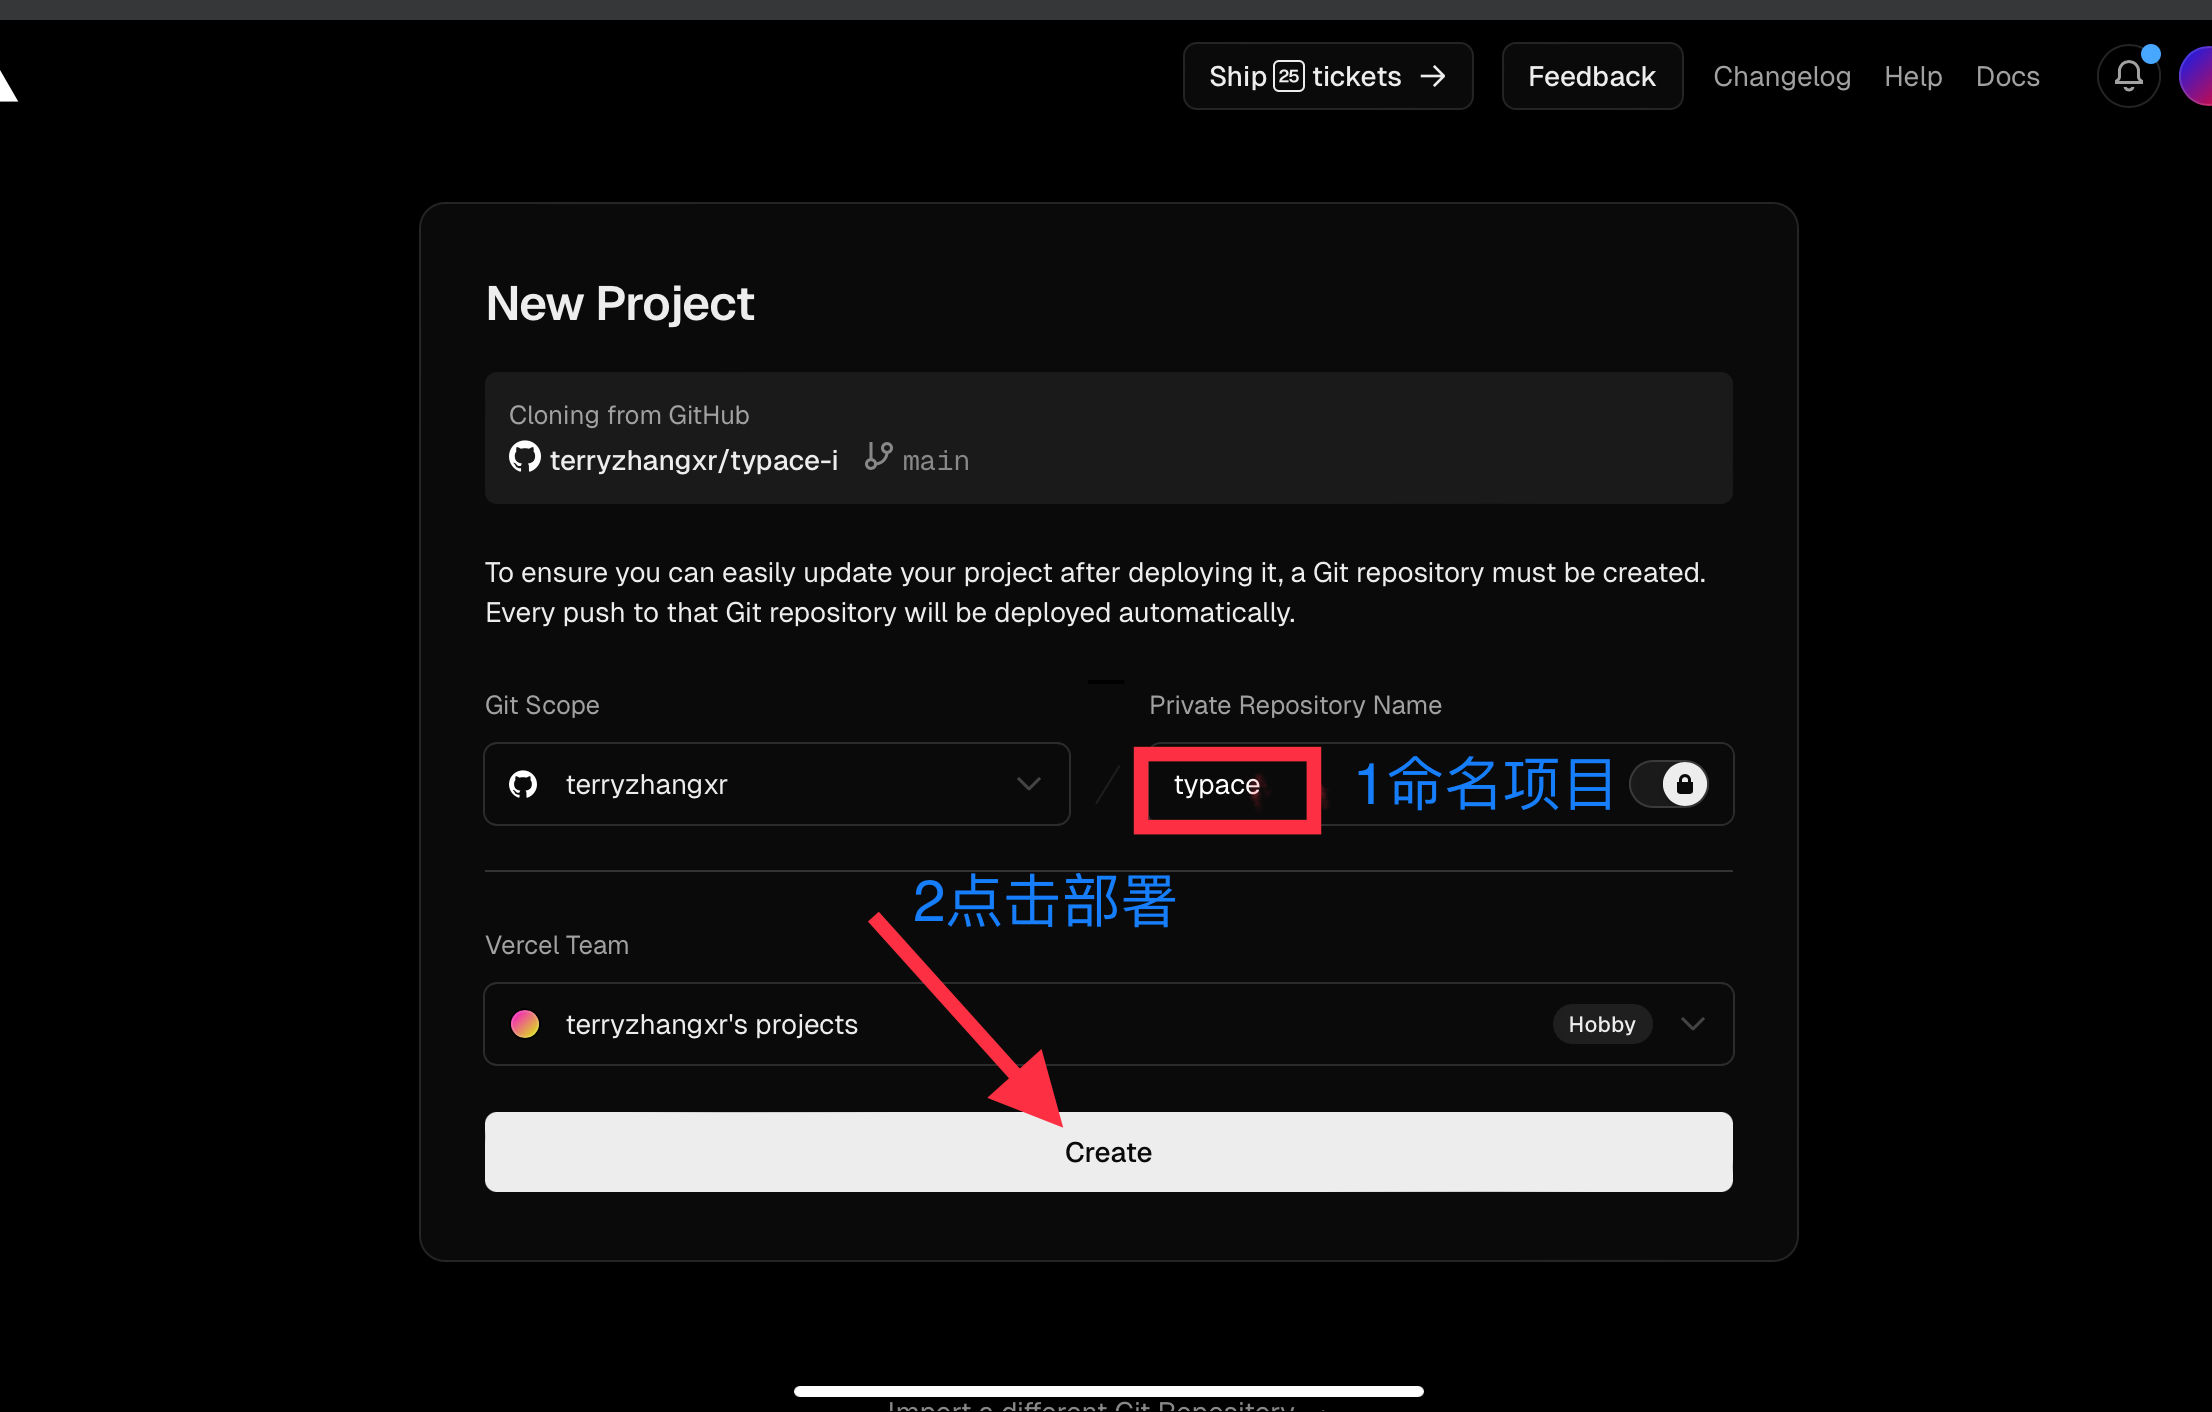
After entering the deployment interface, name your project and click Deploy, as shown below:
 Then Vercel will automatically start deploying your project. Wait about 1-2 minutes and you will see the project deployment completed. Vercel will show you a congratulations screen; click
 go to dashboardto go to the console. -
When you see the following screen, deployment is successful. You can see the blog preview:
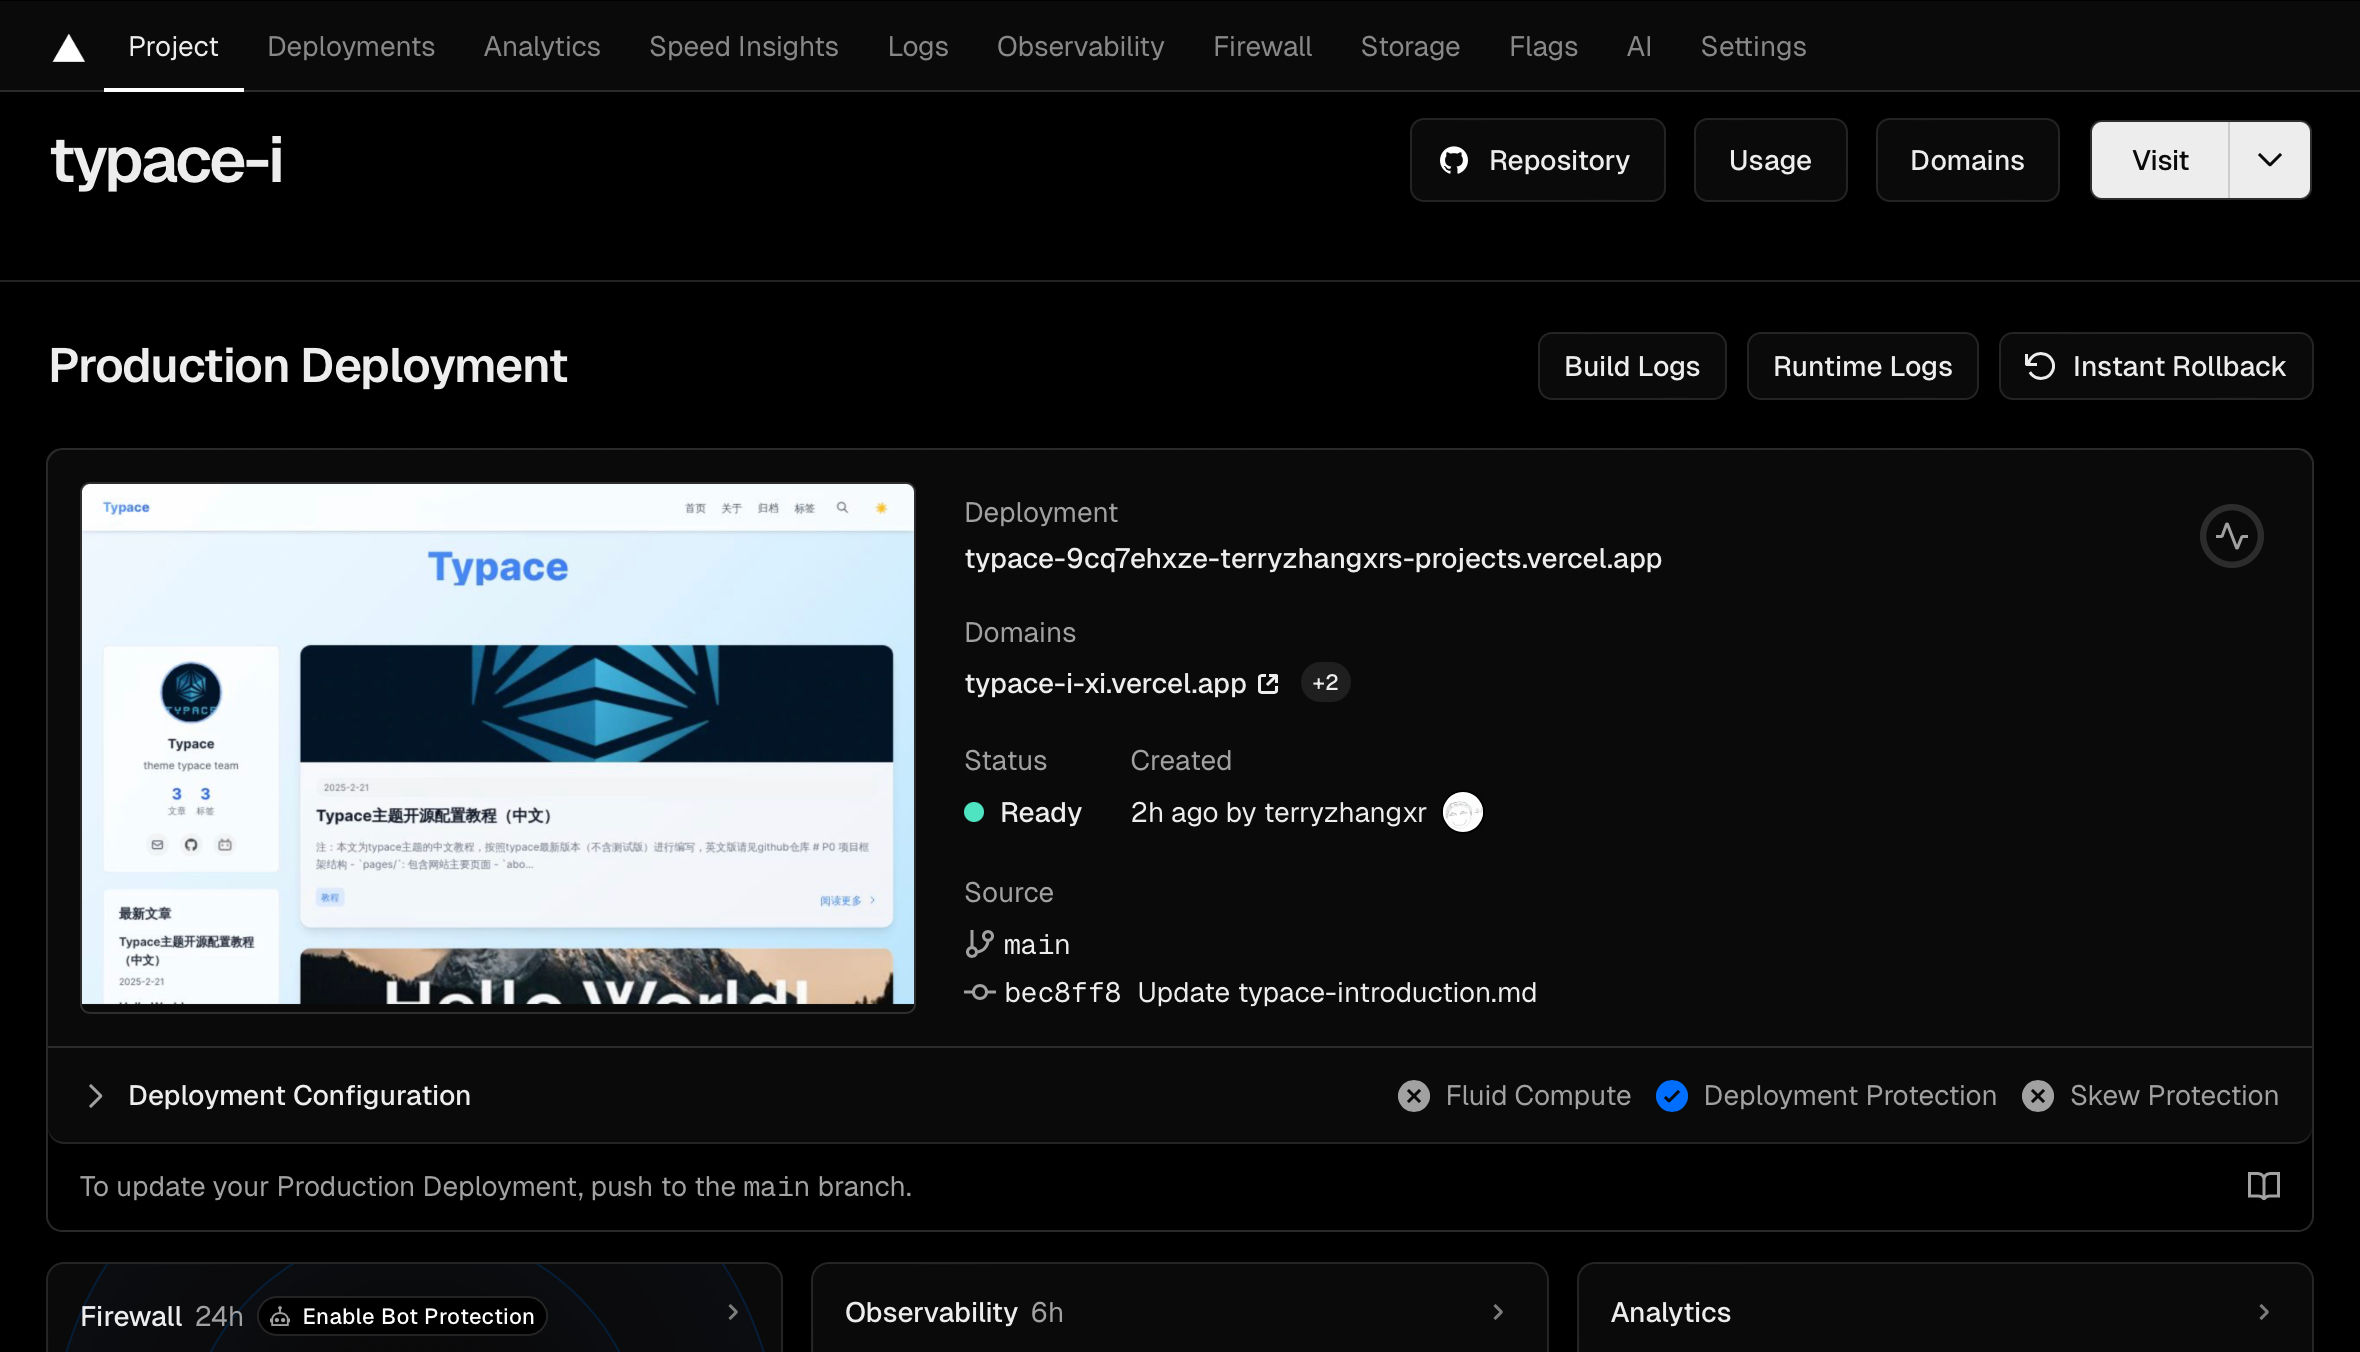 At this point, Vercel will give you a
 xxx.vercel.appdomain. You can clickVisitin the top right corner to access it. However, Vercel is blocked in mainland China! So the Vercel second-level domain cannot be accessed.
The solution is to bind your own domain. Readers who have a domain can continue with the Vercel tutorial below. If you don't have a domain, you need to use a VPN or switch to Netlify or GitHub Pages. Tutorials for those are not yet complete. Sorry about that.
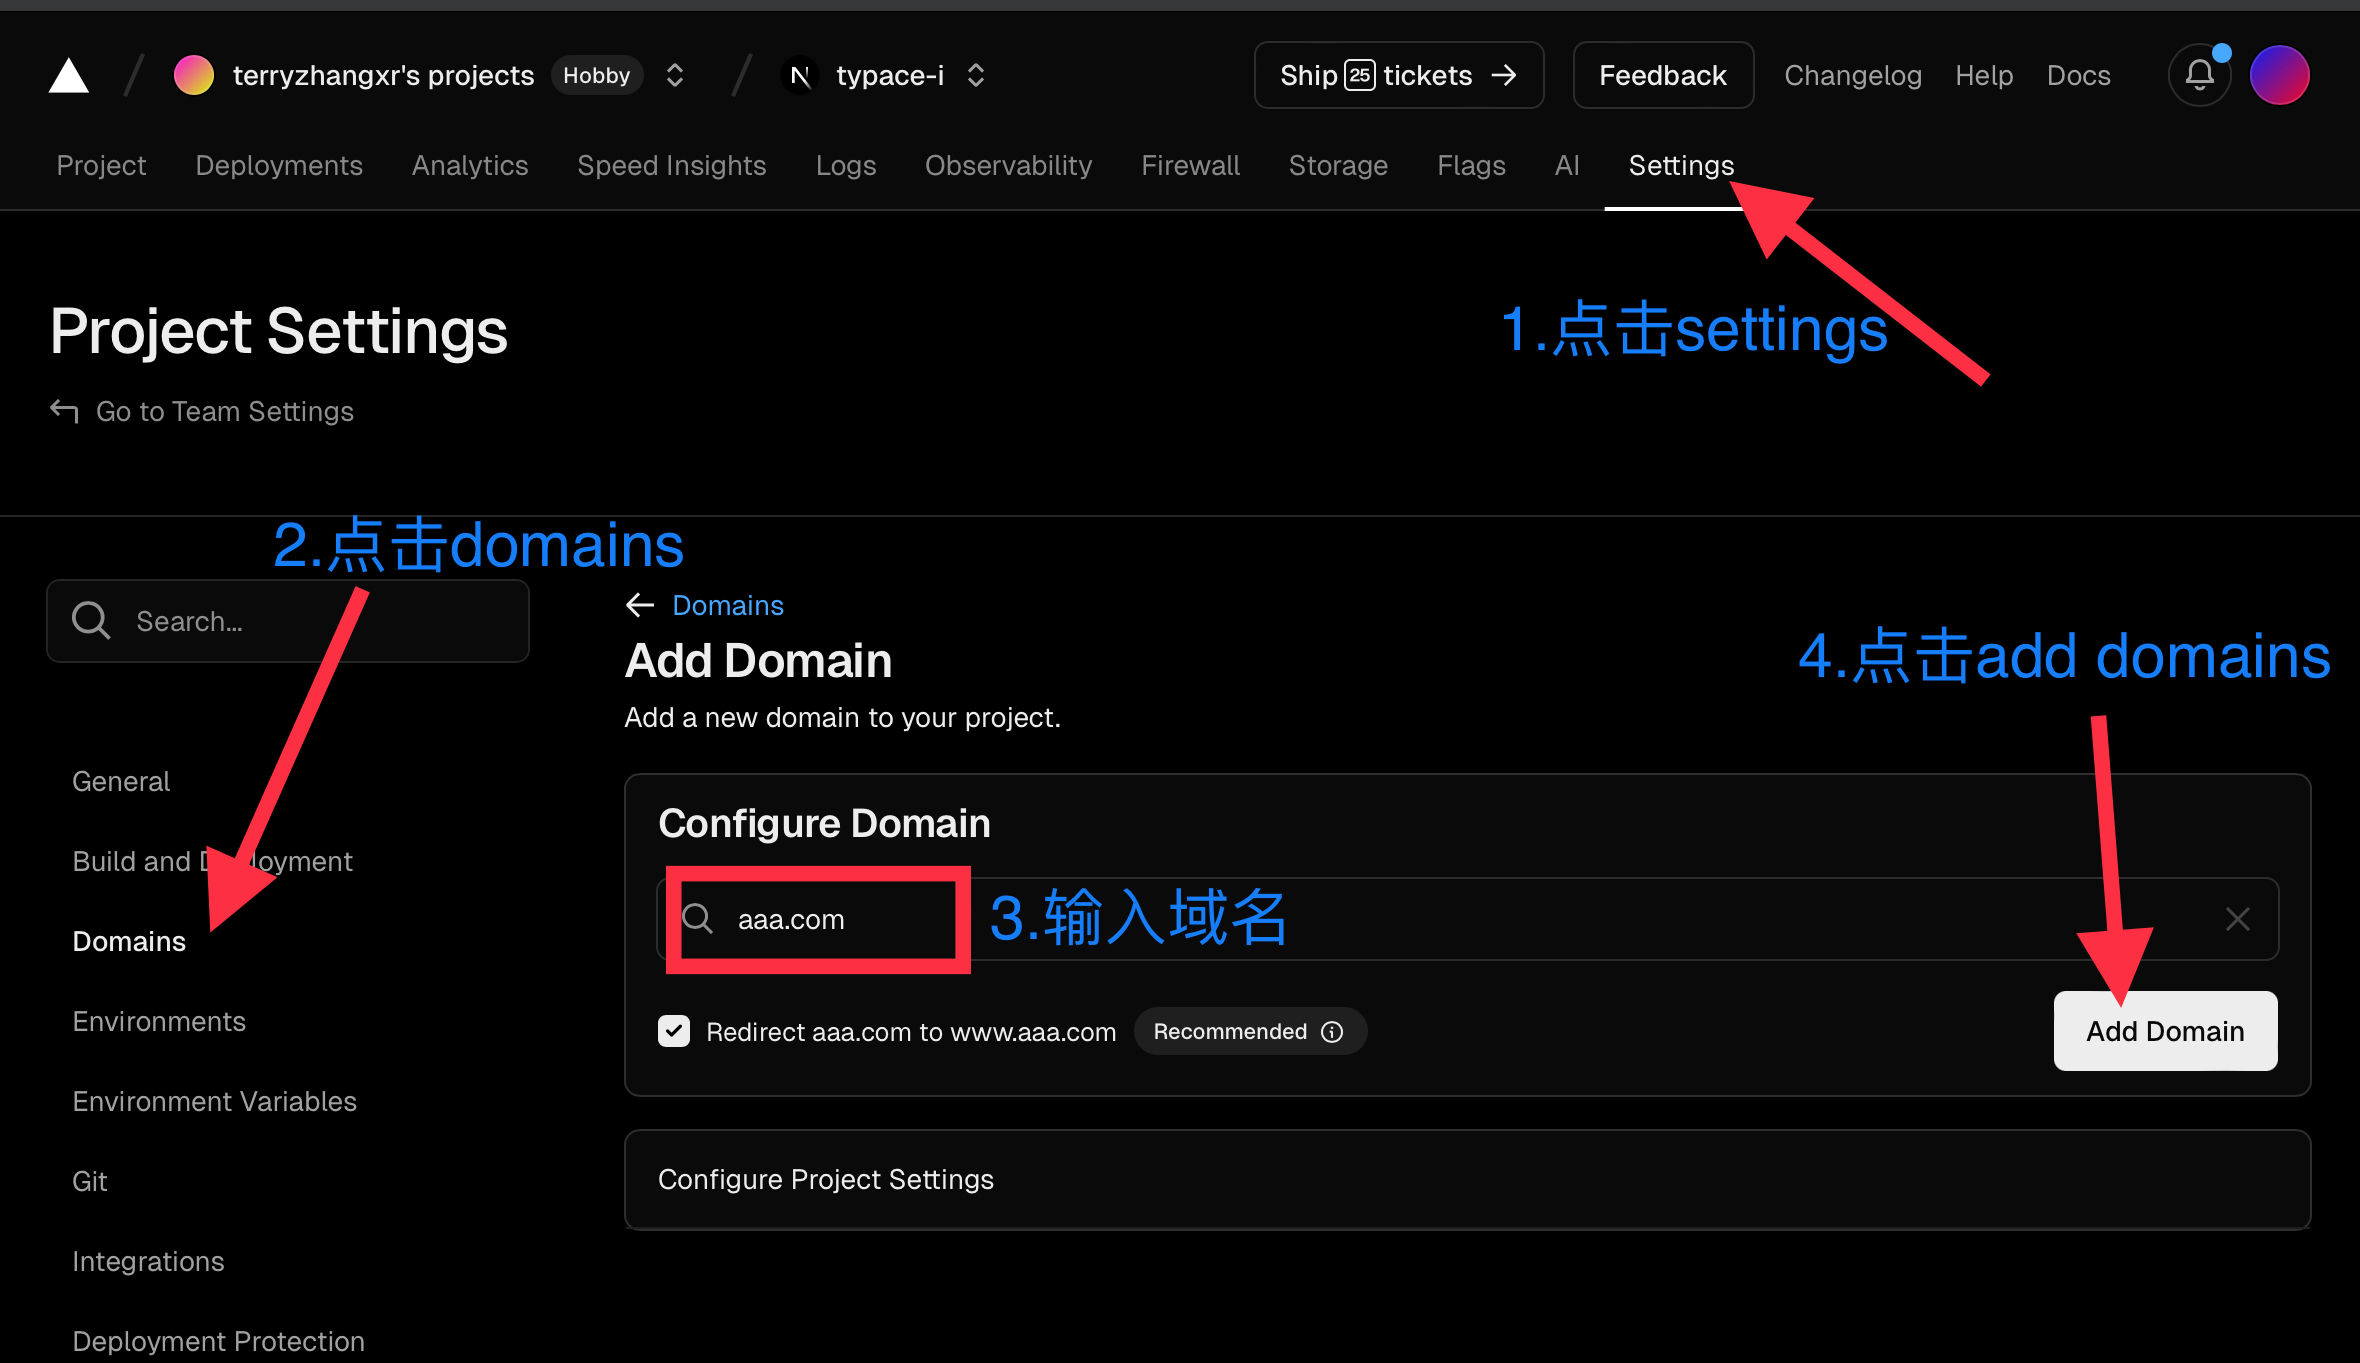
- Bind a custom domain
If you have your own domain, please follow the steps in the image below:
After adding the domain, if it's an apex domain, Vercel will recommend redirecting the original domain to a www-prefixed domain for better speed. Here's an example using my original domain:
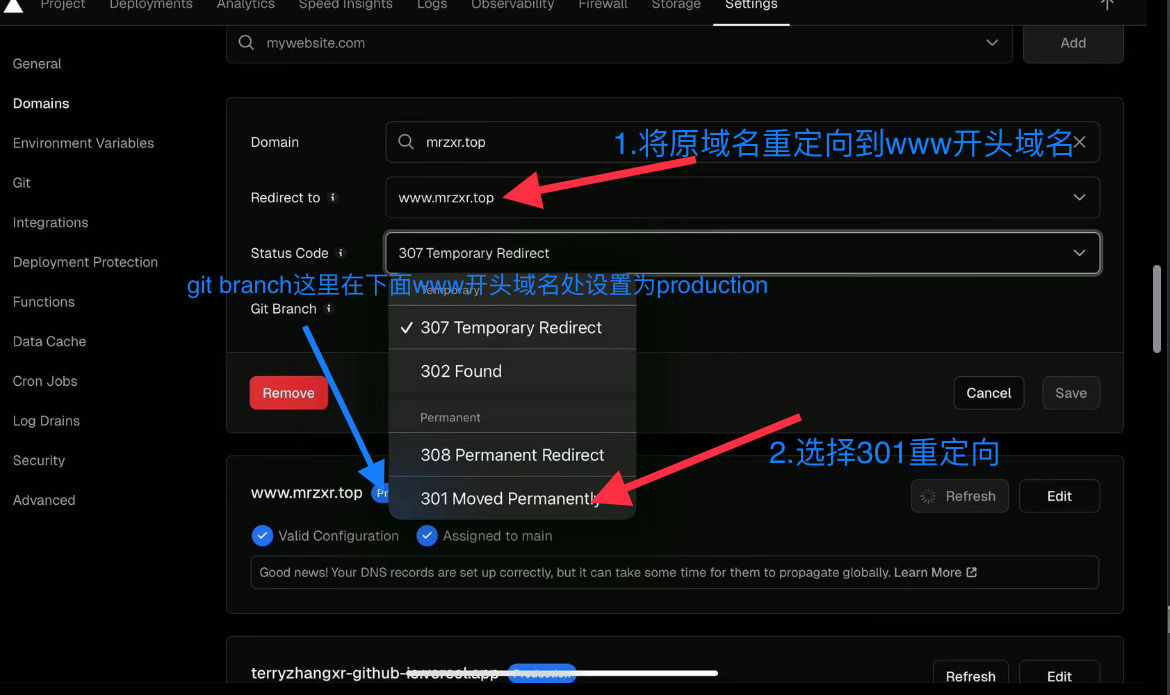 As shown above, first Vercel will automatically add a www-prefixed domain, performing a 301 redirect from your current domain to the www domain. Also, add two DNS records at your domain registrar: one for the apex domain and one for the subdomain. Follow the image:
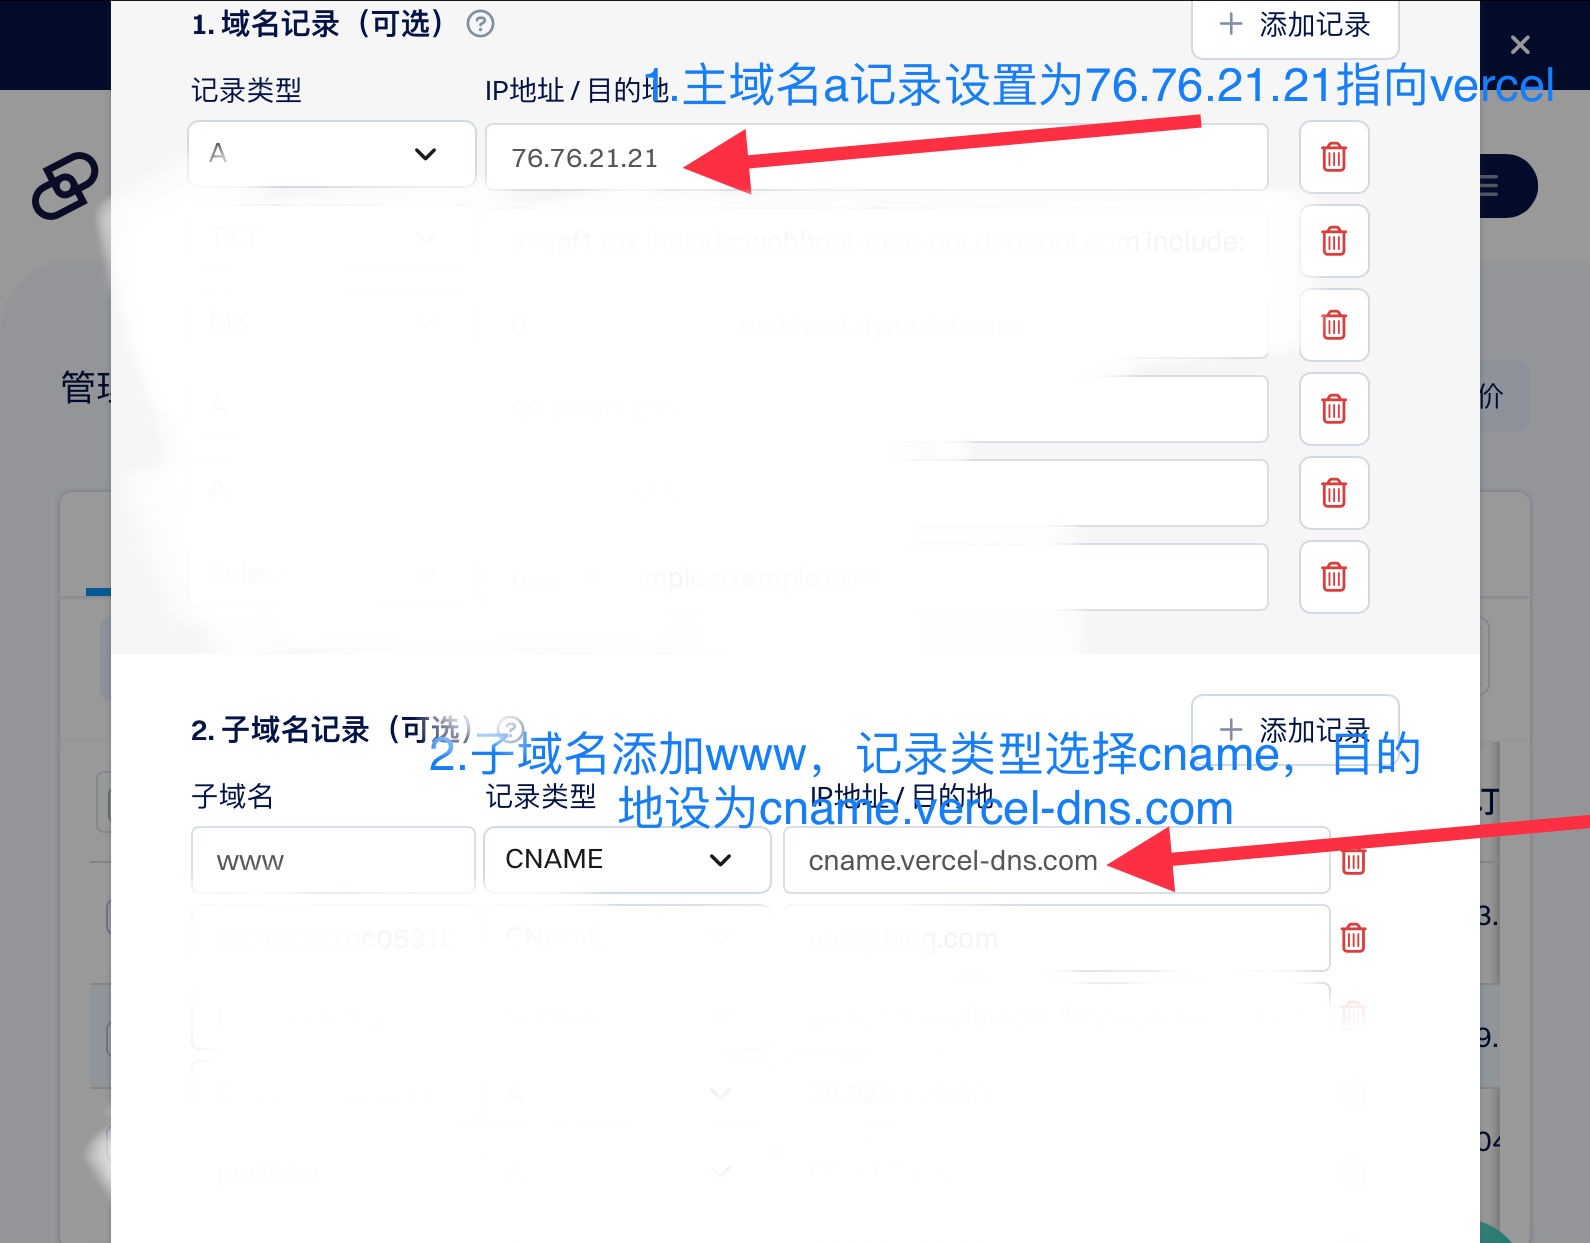 If using a subdomain, you only need to add the domain on Vercel and add the subdomain record at your registrar.
Now you can visit your domain and take a look.
P2 index.js Configuration
Below are some personalization settings. Now go back to GitHub, enter the cloned project repository, and go to pages/ index.js to start configuring.
2.1 Basic Website Title Configuration
In index.js, find the following code (around line 957):
{/* 页面内容 */}
<div className={`min-h-screen p-8 pt-24 relative z-10 page-container ${
isMounted ? 'mounted' : ''
}`}>
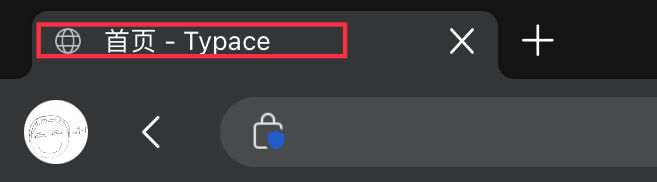
<Head>
<title>首页 - Typace</title>
</Head>
<header className="text-center mb-8">
<h1 className="text-6xl font-extrabold bg-clip-text text-transparent bg-gradient-to-r from-blue-400 to-blue-600 dark:from-blue-500 dark:to-blue-700">
Typace
</h1>
<div className="hitokoto-container">
<p className="mt-4 text-lg text-gray-600 dark:text-gray-400 italic">
<span className="typewriter">{displayText}</span>
</p>
</div>
</header>
Replace Typace and Home-Typace with your own website title, corresponding to the main site title and the browser tab title. The effect is shown below:

Find the code below, which corresponds to the navigation bar title, around line 800:
      {/* 导航栏 */}
      <nav className="fixed top-0 left-0 w-full bg-white/80 dark:bg-gray-800/80 backdrop-blur-md shadow-md z-50">
        <div className="container mx-auto px-8 py-4">
          <div className="flex justify-between items-center">
            <Link href="/" passHref>
              <a className="text-xl font-bold bg-clip-text text-transparent bg-gradient-to-r from-blue-400 to-blue-600 dark:from-blue-500 dark:to-blue-700">
                Typace
              </a>
            </Link>
Change Typace to your title, the effect is shown below:

Both code snippets above allow you to change the font color. The color is set in the line just above "Typace". To change the font color, follow JavaScript syntax, e.g.:
<a className="text-xl font-bold bg-clip-text text-transparent bg-gradient-to-r from-red-400 to-red-600 dark:from-red-500 dark:to-red-700">
This corresponds to a red gradient. For other colors, simply replace blue in the original code with the desired color.